Monday, April 25, 2011

Efficiency

Any time you can save by making your file more efficient is the best!  Below are some ways really great ways to automate your files:

Aliases and Variables
  • I mentioned this previously in my "What to do first?" post and I just want to mention it again because I use this a lot especially when I'm reading in multiple files.
  • Under the Variables tab, setup your own custom global variable and you can use this anywhere in your file

Example:

Let's say you wrote out both high resolution (HR) and low resolution geometry (LR) cache and you are working with the LR files until you render out in HR.  Often times these cache folders are referenced in multiple nodes down on different levels.  If you didn't use a global variable to represent the folder you will have to go down to every node and change the path.  If your file is very big, the chances of you missing a node is increased.

If you used a global variable all you have to do to switch from the LR path to the HR path in all of your nodes is to go back to the Variables menu, select the global variable you want to change and edit the path (second field).

* keep in mind, for this method, the individual file names have to be the same in both the LR_cache folder and the HR cache folder.


Bundles

  • Bundles are groups of nodes, potentially from different networks.  They let you refer to a group of nodes by name instead of listing them explicitly.
  • This is handy for light linking and rendering geometry layers
  • There are two types of bundles: regular bundle (blue) and smart bundle (orange)
Smart Bundle (orange)

  • to create a smart bundle click on the orange folder icon in the Bundle List tab.  This will drop a new smart bundle in the list on the left.
  • To make this even more efficient, edit the script of all the light tools so that the "lgt" prefix is laid down for you when you use the tool.
  • the list on the right is the contents of the bundle.  To add nodes into this bundle double click on the folder and an Edit Smart Bundle Pattern window will pop up.  This is asking for the prefix for the nodes that you are adding.  For example, if you add a "lgt" prefix in front of all your lights and you set your pattern as "lgt*", the bundle will pick up any node that has a "lgt" prefix.  You can extend this further by the type of light.  So if you want a separate smart bundle to only include lights for geometries you can have a prefix "lgt_geo" and a pattern "lgt_geo*". 
    To use these in the Light Linker:
    Just select the bundle name and it will highlight everything within.
    Regular Bundle (blue)
    • With a regular bundle, you have to drag and drop the nodes into the right hand column.  If you drag and drop a node into a smart bundle it will automatically change it into a regular bundle.
    • These might be better for SOPs?
    To use these in Mantra node for rendering:
    • You can have separate mantra nodes for your different render layers (foreground, background, sims, etc.)
    • So under the Objects tab you can put in "@BundleName" for your Candidate Objects, and it will only render the objects in those bundles


    Reference Copy
    • You can right click on any node and make a reference copy of it.  What it does is, it creates another node with all the channels already referenced for you.
    • For example if you want to render a bunch of layers and you want to make a mantra node for each one of them.  First make a master mantra node with all the settings you want.  Then make a reference copy and delete the channels you want to change.  For example, if you only want to render your geometries and you bundled it under "Geo", in the Objects tab under Candidate Objects, list the objects you want to render (@Geo).  You can also, in the same Objects tab, under Forced Phantom list all the objects you want phantomed in your scene (* ^@Geo = everything except for @Geo).  
    • This is very similar to using Takes, but takes is more for testing different variations of parameters.

    Motion Test

    In order for me to see how the fluid actually looks, I had to render out my scene just to get a better sense of what's happening.


    So far, I'm happy with the camera angles, the animation and the motion of the fluid but there's lots to do in terms of lighting, and compositing, and some water fixes.

    Wednesday, April 20, 2011

    Project Update

    After I finished modeling my environment and machine, I began applying the volume fluid network I built earlier.  After some testing and tweaking I feel like I got the movement I wanted.


    The water surface is a volume fluid and the pink points are points drawn from the surfels of the volume fluid and then put through a VOPSOP so that the points are drawn up towards the water surface and pushed out in the direction of the surface normals.

     * I will put in a VOPSOP section later on to go through what I'm talking about

    Happy Easter!

    Wednesday, April 13, 2011

    Machine Model

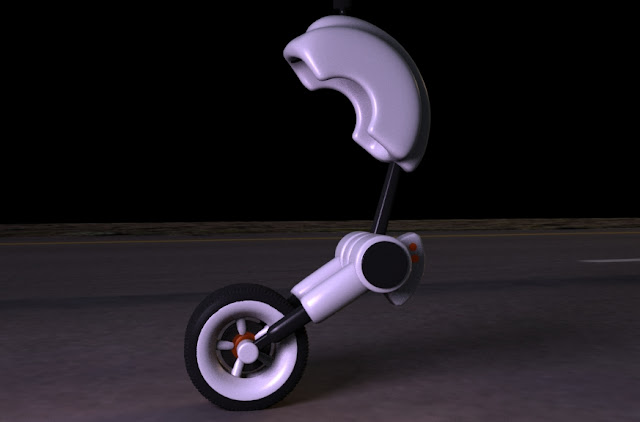
    I had a rough idea for the machine from my research so I started doing some sketches and started modeling the wheel.


    I used a displacement map for the tire treads and played with some lighting and textures


    And then modeled the rest of the machine


    Due to time restrictions I had to stop here and move on to rigging, but I made sure that my model was update friendly in sops before I left.

    Modeling in Houdini

    The best part about modeling in Houdini is having all the tools at your finger tips.  Hit of a tab key, type what you want and you got it.  If you're a destructive modeler (usually character modeling) you'll probably just live in the viewport and sculpt away.  However, if you're a procedural modeler (usually environment/prop) you'll find yourself working more closely with the nodes.

    I found that, when modeling in Houdini, you really have to think about the big picture before you start, especially when modeling procedurally.  It's not the easiest thing to do because any one node on the chain could affect the end result, so you have to plan out where and what you want affected ahead of time.

    Like a lot of modelers I start off with a 2D image slap it on an image plane and start hacking out the form.  Unlike Maya, the way to do this in Houdini is press the d key, for display options, go under the Background tab and select an image.  Keep in mind that by default Apply Operation To All Split Views is checked on.  If you don't want the image on all of your views remove this option before you check off Display Background Images.  To adjust the way you look at the background image go to the 3D Viewport tab.  Unfortunately, if you are using single view and you switch views using the space + 1, 2, 3, 4 options the background image will not change because that background image is attached to the "view".

    From here it's just a matter of getting to know the nodes, where to put them and what you can do with them.

    Typically you would model in the SOP/ Geometry level and animate in the Object/ World space.  So that your Object level will hold all your individual characters, props, and environments.

    Some really handy nodes:

    Merge - you can only see one node/ node chain at a time in the geometry level so you need a merge node to combine the node/ node chains together

    Object Merge - allows you to extract any node in the chain to work on elsewhere.  For example, you can use this for visualizing your end result as your working on the nodes above.

    Null - is a place holder which you can add custom parameters used to drive other things.  Usually used as an "out" placeholder at the end of a node chain, so if other nodes are dependent on the end of the chain, you don't have to keep changing the last node.

    Fuse - will merge points, edges, faces together

    Crease/Facet - it's a little tricky understanding hard edges in Houdini.  It seems like everything is smoothed when rendering so if you need a hard edge you need to add more edge loops or you can add a crease node.  But with the crease node you won't be able to see the result until you render.  If you use the Facet node/ Cusp Polygons you will get the hard edges but that's because it actually breaks apart the edges (which is probably not what you want).  Best bet is probably add edgeloops, but then you're creating more polys so choose your weapon well.

    File - use this to write your your geometries or read them back in.

    Group Geometry - allows you to select a group of points/edges/faces and put them in a group which you can name.  The group name will then be an attribute you can use later on down the chain

    Delete/Blast - Blast is pretty much what gets laid down when you hit the delete key.  If you have a group geometry before this node in the chain, you will find the group name in the drop down menu for you to blast.  Delete is similar to blast but has way more options, like deleting by expression or delete with bounding box.

    Visability - if you want to hide parts of the model while your working (this does not delete the geometry so don't forget it's there).  You'll notice the visibility flags in the geometry level is just for displaying that node vs. another.

    Sweep, Resampling, Skin - great for making tunnels, cables, rails, etc.

    Point, Attributes and Primitive - these are also really great nodes to use but I haven't mastered them yet


    * q key repeats the last node, to template more then one node hold down the ctrl key when highlighting the template flag

    Really awesome example of procedural modeling: cmiVFX: Road Creation

    Thursday, April 7, 2011

    Volume Fluid Tests

    Here's some videos of volume fluid tests I did.

    I first started out using the shelf tools to get the fluid surface:


     Then I tried using the whitecaps tool from the shelf: I liked how the particles spread out to the side.


     Then I tried to get more particles from using the surfels:


    Then I combined the two together:


    Lastly some bubbles!


    It took me about a month to get to this point. It was a lot of tutorial watching and some VEX building to get the effects I was hoping for and I was pretty happy with the results....UNTIL one day Jeff Wagner, our Senior Technology Consultant stopped by my desk and blew my mind!  I couldn't thank him enough for sitting down with me and showing me the stuff that he did.  It was like a week's full of lessons all crammed into two and a half hours.

    *updates to come

    Dynamics

    I was advised to work on the fluids before I started to really model anything.  At the time I didn't understand why, I thought it would be best to figure out how big everything was so that when I add the dynamics I wouldn't have to fiddle with it too much.  But since I kinda already knew how to model and I wanted to learn dynamics more anyways I took the advice and started with the fluid dynamics first, just with a very simple tube.

    Since I had some rough geometry from my animatic/previs I based my sim size to that

    To create rigid body object and having it break is as simple as clicking some shelf tools!  It's amazingly fun and easy.

    Try it out with the GO| Procedural Quick Start Guide

    It's best to use the shelf tools when dealing with dops because the shelf tools will automatically lay down nodes that you need and might need later on.  Sometimes there's benefits in building your own dopnet and drawing in things yourself, like if you're trying to do something more custom.  But for the most part you want to use the shelf tools and then go backwards, just in case you forget a node or forget a setting.

    For example, gravity, if you use the shelf tool for gravity it lays down a force node with a gravity setting of -9.80665, which is a real world setting.  If you were to just lay down a force node you would just get zero.  I find it's easier use the shelf tools for the recommended settings and nodes and then customize it that way.

    Fluids

    I've never worked with fluids before so it took me a while to wrap my head around fluids and the different types inside Houdini. It was also hard finding good intro videos out there for fluids.

    Basically there's 3 kinds of fluids:
    1. Volume Fluids - needs to know dops
    2. Particle Fluids - needs to know pops
    3. Flip Fluids - needs to know both
    I wasn't really sure which one to use and I knew I had to break up my tunnel into several pieces, because otherwise it would just take forever to render.  So this is how I broke it down:


    My fluid tests for the first section of my tunnel: click here

    Volume Fluids

    I learned very early that it's not easy getting fluids to sit still especially for Particle and Flip fluids so for the first section of my project I'm using volume fluids.  With volume fluids you're basically working inside a liquid container which is filled with voxels or an SDF field (this is how I understood it).  When you place a liquid object inside the container an SDF field is built for that object and the two fields will interact with one another to get a liquid surface (dops).

    When you create a volume fluid make sure you check out the details view for the AutoDopNetwork.  There's lots of useful data that's generated with the fluid that you can use to drive other things elsewhere:

    This one comes in by default so you can see what your liquid surface looks like.

    This is the SDF field which can be used for fog.

    These are the surfel points which can be used in a popnet.

    This is the velocity field which can be adjusted with VOP for some vectors.


    *check back for Particle and Flip fluids

    Other makers of fluid effects: RealFlow, Exotic Matter's Naiad


    Wednesday, April 6, 2011

    What to do first?

    I started out wanting to learn everything...or at least translating my Maya knowledge into Houdini.  It took me a while to get over the fact that they just aren't the same.  Yes they are both 3D packages but one is polygonal based and the other is node based.  So of course the way to get the same result is going to be different.

    But I had to start somewhere so I had to shake off my Maya hands and convert them to Houdini hands.  By that I mean the way your hand is positioned on the keyboard, mouse and tablet.  I had to relearn my shortcuts and how to work in the Houdini UI. 
     
    First and one of the most important things I learned is that the position of the cursor in the UI activates different things.  Keep this in mind when using shortcuts

    Handy Shortcuts to note

    In the network view
    • shift + click on a node in a node tree will move the node and all the above nodes attached to it.
    • ctrl + click on a node will move the node and all the nodes below it.
    • l to organize the nodes
    • n cycles between the given name of the node and changed name
    • w will open tree view
    • p will open parameters
    • x will open groups
    • c for color
    • o for network navigation

    In all views:
    • ctrl + b will maximize the pane
    • u key to go up a level
    • i key or enter to go into a level

    In the viewport:
    • when you have the selection tool in use l key will select the loop, f key will select the adjacent point (2) /edge (3) /face (4) in the direction of the pink arrow head. To change the direction of the pink arrow shift + r.
    • when you have the handle tool in use you can cycle through the manipulator with the y key
    • q to repeat the previous tool
    • when you have the selection tool in use the 5 key activates the vertices this is used for picking UV coords. 
    • space + 1, 2, 3 ,4 ,5 activates different views
    • ctrl + 1, 2, 3, 4, 5, 6, 7, 8 activates multiple views
    • ctl + n to select a view (you can tell what's selected by the yellow text in the top right corner).  If you have multiple views and you want to do a flipbook you will need to select the view you want to use.
    I must say of all my shortcut keys my favorite is the TAB key.  It brings up all the available nodes for the network you're in.  I love that you can just type in the name of the node you want to use instead of having to visually find it.  Thanks python!

    For more shortcuts check out the GO|Procedural Guide  (most of the the shortcuts are on the last page)

    UI Setup

    Below are some Preference changes I found useful:

    If you work in a dark environment, Houdini Dark might be better on the eyes
    Enabling Color Pane Headers will give visual ques as to which network you're in
    Enable Drop-on-wire is really handy when moving nodes around
    Turn off Auto-Commit, it acts like auto-key on keyed frames even if auto-key is off
    Houdini uses Meter units by default, if you need to change that here it is
    This is one of my favorites:
    • you can setup your own custom global variables, similar to default $HIP (example below)
    • this is very handy if you are writing/reading multiple files to disk.  You can give a custom variable name and set the value to the path that you're storing all your caches. If you change that folder name or move it somewhere else in your computer, you can just come to this and change the path instead of going through each parameter to change the path.


    If you find that you like your nodes a certain way, by default, you can also change them with the gear symbol in the parameter pane:
    I like having my Remove Inline Points enabled every time I use the dissolve node


    Resources

    TUTORIALS/ HELP

    SideFX video tutorials - http://www.sidefx.com/index.php?option=com_content&task=blogsection&id=14&Itemid=132
    SideFX example files - http://www.sidefx.com/docs/houdini11.0/examples/
    SideFX help - http://www.sidefx.com/index.php?option=com_content&task=view&id=1085&Itemid=281/
    Peter Quint on vimeo - http://vimeo.com/user2030228
    cmiVFX - http://www.cmivfx.com/
    Digital Tutors - http://www.digitaltutors.com

    FORUMS/ BLOGS


    Houdini Forum - http://www.sidefx.com/index.php?option=com_forum&Itemid=172
    Jeff Wagner's Blog - http://www.sidefx.com/index.php?option=com_content&task=blogcategory&id=115&Itemid=216
    Od[force]  - http://odforce.net/


    DOWNLOADS 

    Houdini software - http://www.sidefx.com/index.php?option=com_content&task=view&id=589&Itemid=221
    Assets (Houdini Exchange) -http://www.sidefx.com/index.php?option=com_wrapper&Itemid=8

    Digital Assets

    I started off my internship doing the GO Procedural Guides from the Sidefx website and one of the first things I learned was digital assets.


    To learn how to make one check out GO Procedural | Nodes, Networks and Assets

    What is an OTL?

    Otl's are like plug-ins. They need to be installed and they hold Digital Assets.  By default when an otl is created it gets created in the Houdini preferences folder.  When a Houdini session is opened by default it will look in the preferences folder for any otls and make them available for use.  In that case you don't need to install the otl because Houdini does it for you.  However if you saved your otl elsewhere, you will need to install the otl in order to use it.

    What is a Digital Asset (otherwise known as HDA)?

    Digital Assets are generally created by TD's for Artists to work with (by default is saved into an OTL file).  Its a node, or a tool, that can hold multiple sets of nodes and scripts with a custom UI for Artists to manipulate.

    Working with the Digital Asset after you created it:

    Installing Digital Asset

    Check what's been installed

    What it could contain

    Modifying the OTL
    You an only modify the otl when it's unlocked. When the Digital Asset name is blue it's locked/ red unlocked.
    Allow Editing of Contents
    • will unlock the asset
    Match Current Definition
    • reverts the digital asset back to what's saved in the otl....only for the contents inside and not the type properties.
    • it will also lock the asset back up
    Save Operator Type
    • will save all changes to the digital asset to the specified otl path in the type properties

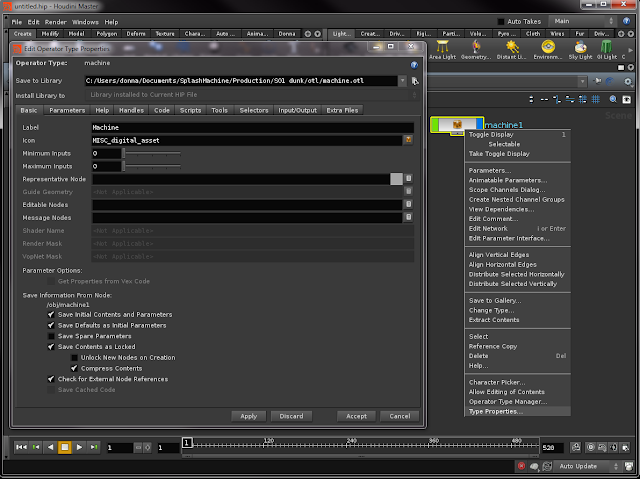
    Type Properties:

     Basic Tab
    Where to change the label and where to save.  !!! Once accept is hit it will save to library. Make a backup copy before you test things out. !!!
    Save to library 
    • it's a little tricky to understand so don't change this unless you know what's happening.  If you just change this destination you are just saving out to the specified otl, but doesn't mean you are working with that otl.  If you want to work with it you will have to install it.
    Label
    • is the label you see when you press tab in the network view, under digital asset
    Parameters Tab
    • Here you can customize your UI for your digital asset, set limits, defaults and scopes.
    Range
    • Is where you set your limits for your sliders.  If you don't press the locks on either side, you can still go beyond the slider, so it kind of acts as a recommendation.
    • If you want to set an absolute limit then activate the two locks.
    Disable When
    • this is where you set parameters to show dependent on other parameters for example Path Object's Position parameter will only show up if something is filled into the Path Object parameter.
    • this expression is neither python or hscript....possibly from prisms when Houdini originated
    • how to use disable when: here
    Parameters/Channels Tab
    • This is where you set your Default values for your channels
    • The Autoscope button allows your channels to be seen in the Channel Editor by default
    Tools Tab
    • This tab hold the code for how the digital asset node is created

    To see the otl path for the digital asset

    Display Menu of All Definitions to get the Asset Path


    How to make a different variation of a digital asset:

    There are two ways to do this, depending on how you want to interact with your HDA.

    Option 1:


    Let's say you created a basic HDA template for a human character and you want to save out a separate, stand alone copy for your actual character model.
    Copy the digital asset through the Operator Type Manager.
     Operator Name
    • this is the ONLY place you can change the default name of the node
    • if you don't change the name problems will occur when you try to install version one and version two with the same name.  One will just override the other.  So if you want them to be completely independent of each other you have to change this name (unlike Option 2).
     Operator Label
    • is the name that shows up in the tab menu
    • this can also be changed in type properties
    Save to Library
    • by default will save to Houdini's preferences folder for use in all Houdini sessions
    • this can also be changed in type properties
    Notice they each have only one Asset Path


    If you need to replace one for the other, make sure both are installed first then:

    Right click on the HDA node and select Change Type, then find the new HDA in the list.
    If you kept the Name, check the Asset Path to see if it changed it correctly.

    Option 2:

    If you have an otl that you're working on and you want to keep periodic backups of your file, or if you have a character that you want to update but you don't want to replace the original.

    If you type Embedded in the Save to Library field, it will embed the HDA into the hip file.

    If you save this way, all you have to change is the Save to Library in the Operator Type Properties and accept.

    You will notice that if you press tab only one "machine" digital asset will show up and that's because (like mentioned above) the Operator Name was not changed.  To change between the otl files go to the drop down in the Asset Path and pick which one you want to use.

    *keep in mind that if you have multiples of this node, when you change the asset path for one it will change it for all.  Changing the Asset Path is the same as going into the operator type manager and setting the definition

    Green is the currently used definition, Red is the one not in use.
    If you leave the Operator Type Manager up and change the Asset Path it will update as well.


    If you've animated your digital assets how to bring the geometry into dops:

    The way dops works is that it creates the collision geometry (iso offet/SDF) for the geometry being brought in and then it evaluates it with other things in the dopnet.

    If your animation for the geometry is in the obj lvl dops will just create one collision geometry and use the transforms on the obj lvl to move that collision around.  (it usually takes longer at the first frame of the sim because the collision geometry is being created but after that it will sim a lot faster)

    However, if you object merged the geometry or wrote it out to file to bring it into dops, you will notice that the animation of the object is no longer there and you need to check off the deforming geometry to get it to work.  If that is the case it means that it's no longer taking in the transforms and instead just treating the geometry as a new geometry at every frame.  As a result creating a new collision object at every frame. !!!! this will take SUPER long to sim !!!!

    Since digital assets are by default locked, you will need to allow editing of contents to get down to the geometries you need and then make them into RDB Objects for dops.

    To start your sim later in the timeline:

    There's two places to control this: the Start Frame of the AutoDopNetwork in the obj lvl and Creation Frame of the Object in the Dynamics lvl.

    You can start your AutoDopNetwork and then have objects come in at different times, but the AutoDopNetwork always has to start before your object so make sure the Creation Frame is larger then your Start Frame.

    Monday, April 4, 2011

    sops, dops, pops, rops, vops, shops and chops?!

    My first few weeks was spent watching and doing a lot of tutorials.  There were a few things I had to get over when I was first started out using Houdini
    1. The language - learning what sops, dops, pops, etc means.  Almost any Houdini tutorial you watch they refer to these operators
    2. The network - going in and out of networks and which nodes belongs to which
    3. Expressions, variables and scripts are your best friends
    4. It's just not like maya - get over it and keep an open mind
    Helpful intro tutorials:  Go Procedural Intro guide from SideFX and Houdini+Fundamentals from cmiVFX.  

    Houdini Apprentice is FREE to learn Houdini with. Only downside is the Apprentice license can only generate apprentice files, so if you upgrade to escape or master later you can't use your apprentice files there.

    Language & Networks (my simplified version)

     Everything starts off at the Object level/ Scene network. (You can tell by looking at the network view where you're at.)


    OBJ - Objects, lives in Scene network, rig, light, camera and digital asset nodes or other networks can be held here
    SOPs - Surface Operators, lives inside the Geometry network, mainly for modeling
    POPs - Particle Operators, lives inside the Particle network, for particle effects
    DOPs - Dynamic Operators, lives inside the Dynamic network, dynamic effects
    ROPs - Render Operators, lives inside the Output network under "out", for setting up renders
    COPs - Compositing Operators, lives inside the compositing network under "img"
    CHOPs - Channel Operators, lives inside the Motion/Audio network, animation and sound manipulation
    SHOPs - Shader Operators, lives inside the Shader network
    VOPs - VEX Operators, lives in the VEX Builder network, for building custom procedures

    You travel in and out of these networks through nodes (as seen in picture above, usually dop, pop, vop) or through the drop down list (which are global networks, usually shop and out). 

    Expressions, Variables and Scripts

    What makes Houdini procedural is it's methods of using expressions, variables and scripts to manipulate channels.  Channels can be referenced, evaluated and sometimes overridden by  other channels.  Learning these becomes very useful, but keep in mind Houdini uses Python and Hscript.  If there's an "H" on the top right hand corner of your parameters view you're using Hscript, click on it to change to python.  When in doubt, open up the Textport view and type in exhelp to get a list of commands, help on what they are used for, and how to use them in both languages.


    Other helpful sites: Houdini Object Model CookbookExpression CookbookGlobal Variables

    Friday, April 1, 2011

    the approach

    From my experience at Sheridan I knew that working on this project on my own would take up most of my internship (if not all) but I liked this challenge and I thought I could learn Houdini more holistically this way.

    I started researching and suggesting looks to make sure I was on the right track:
    Bjork - All is full of love

    Then I started laying out my shots, worked with the timing and did a little previs (minus the fluids because I didn't know how to do it at the time)

    where it all began!

    I've been working at Side Effects Software as an Animation Intern for about 2 months now and seeing that I'm making some progress I'm going share what I've been up to!

    Before I started my internship I only knew how to model and texture in Houdini and that was about it. I knew that Houdini is known for it's awesome VFX tools and I didn't play with particles and such in Maya too much. So when I was asked during my first week at Side Effects what I wanted to accomplish during my 4 month internship, my answer was to learn as much as possible about the VFX tools.  I took this as an opportunity to broaden my skill set as a 3D Artist.

    Animation Interns fall under their Marketing department.  There are a lot of developers in the Toronto office but very little artists.  My role here is to do software testing, suggest improvements and add to their marketing materials.  I came on board right when they're doing a series of effects tool features. I was given a storyboard featuring fluids to work on and I've been at it ever since.

    Storyboard provided by Scott Keating, Product Specialist @ SideFX

    how we met...

    I graduated from Sheridan College's Post Grad Computer Animation course in August 2010, where I learned a lot about the animation pipeline. Everything from story boarding, layout, animatics, modeling, rigging, animating, lighting, rendering, to composting. I used mostly Maya, After Effects and Photoshop for my school work. (My final film can be viewed at my website: www.tangdonna.com)

    Upon my graduation I had the opportunity to work at Screen Industries Research and Training Centre, situated at Pinewood Studios in Toronto, as a Research Associate. Previs with motion capture was a large part of my role at the SIRT Centre. I had access to SIRT's optical motion capture facility, which is where I received training for setting up mocap cameras, setting up virtual cameras, placing markers on the actors, and calibrating the machines. My role also included building low poly previs assets in Maya and Houdini and testing it in Motion Builder and Blade.

    I started learning and using Houdini in November, at SIRT. They sent me to a two day training course at Side Effects Software and that's where I learned about their Animation Internship.